cmdref.net - Cheat Sheet and Example

cmdref.net is command references/cheat sheets/examples for system engineers.

User Tools

Site Tools


Sidebar


Cloud


Etc


Reference


.

hardware:junos:cluster.html


How to Configure SRX Chassis Cluster(HA)

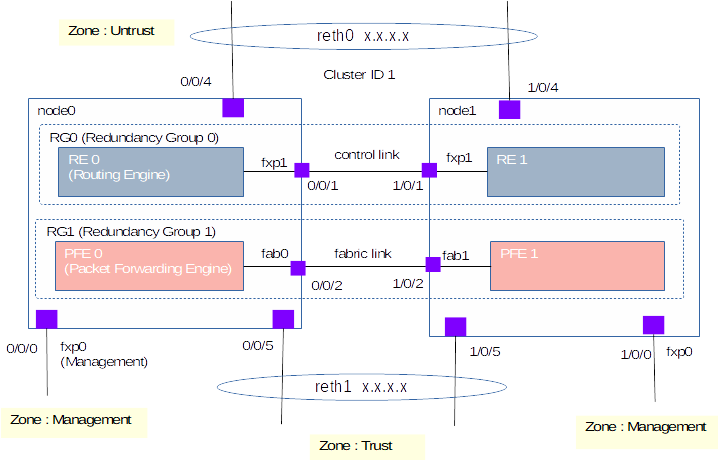
About Chassis Cluster


Check Chassis Cluster

root> show chassis cluter status
root> show chassis cluter interfaces
root> show chassis cluter statistics
root> show chassis cluter control-plane statistics
root> show chassis cluter data-plane statistics
root> show chassis cluter status redundancy-group 1


Failover

###Failover
node0 >  request system reboot

###Failback
node1 >  request system reboot


How to Configure SRX Chassis Cluster(HA)

Check SRX

root> show chassis hardware detail
root> show version
root> show system license

Check Cable

  • Control Link
  • Fabric Link


Chassis Cluster

Device1/Device2
root# delete
This will delete the entire configuration
Dlete everything under this level? [yes, no] (no) yes

root# set system root-authentication plain-text-password
root# commit
Device 1
root> set chassis cluster cluster-id 1 node 0 reboot
Device 2
root> set chassis cluster cluster-id 1 node 1 reboot


each node configuration

Device1
{primary:node0}
root> configure

root# set groups node0 system host-name srx1
root# set groups node0 interfaces fxp0 unit 0 family inet address 172.20.1.1/24

root# set groups node1 system host-name srx2
root# set groups node1 interfaces fxp0 unit 0 family inet address 172.20.1.2/24

root# set apply groups "${node}"


Configuration of SRX Chassis Cluster(HA)

Device 1
root# set interfaces fab0 fabric-options member-interfaces ge-0/0/0
root# set interfaces fab1 fabric-options member-interfaces ge-1/0/0


Configuration of redundancy group

redundancy-group 0 is for routing engine redandancy.
redundancy-group 1 is for interface redandancy.

root# set chassis cluster redundancy-group 0 node 0 priority 100
root# set chassis cluster redundancy-group 0 node 1 priority 1

root# set chassis cluster redundancy-group 1 node 0 priority 100
root# set chassis cluster redundancy-group 1 node 1 priority 1


Configuration of interface monitoring

root# set chassis cluster redundancy-group 1 interface-monitor ge-0/0/3 weight 255
root# set chassis cluster redundancy-group 1 interface-monitor ge-0/0/4 weight 255

root# set chassis cluster redundancy-group 1 interface-monitor ge-1/0/3 weight 255
root# set chassis cluster redundancy-group 1 interface-monitor ge-1/0/4 weight 255


Configuration of redundant interface

Reth is Redundant Ethernet Interface.

root# set chassis cluster reth-count 2

root# set chassis reh0 redundant-ether-options redundancy-group 1
root# set chassis reh0 unit 0 family inet address 10.10.10.200/24

root# set chassis reh1 redundant-ether-options redundancy-group 1
root# set chassis reh1 unit 0 family inet address 192.168.1.1/24
Interface assignment
root# set interfaces ge-0/0/3 gigether-options redundant-parent reth0
root# set interfaces ge-1/0/3 gigether-options redundant-parent reth0

root# set interfaces ge-0/0/4 gigether-options redundant-parent reth1
root# set interfaces ge-1/0/4 gigether-options redundant-parent reth1
Setting Security Zone
root# set security zones security-zone Untrust interfaces reth0.0
root# set security zones security-zone Trust interfaces reth1.0


Commit Configuration

root# commit check
root# commit


How to delete cluster and factory configuration

set chassis cluster disable reboot


Replacing a Unit in a Cluster mode

Power the Juniper replacement on and check its version:

root@srx# show version

Note: both nodes must be running the same OS version.

I am going to assume both devices are on the same OS version.
Note: I'll write another How to later about how to upgrade the OS on an Juniper SRX.

root@srx# delete          ### Note: this command will delete the whole configuration and leave your device blank
root@srx# set system root-authentication plain-text-password
root@srx# commit

Once you have at hand your cluster ID and the node number, type in the following command:

root@srx> set chassis cluster cluster-id 1 node 0 reboot

Note: the command above will set your new Juniper to be part of cluster 1 and it will be node 0, then
it will reboot.

Returns all Configurations

root@srx> request system halt

Connect all the network cables “same as before”.

Power on the new device.

Check cluster status – both the nodes should be back online.

>show chassis cluster status


Reference


hardware/junos/cluster.html.txt · Last modified: 2021/02/06 by admin

Page Tools